How to Tie a Half Windsor Knot: A Classic Look Every Man Needs to Know

The Half Windsor Knot gives your tie a sharp, balanced look that’s perfect for both formal and professional outfits. When you learn how to tie a Half Windsor Knot, you gain a timeless skill that adds flair and sophistication to your style. This knot forms a neat triangle that fits over most collars and creates a deep, well-defined dimple, making it ideal for everyday wear. To get started, follow the simple Half Windsor Knot steps or refer to the Tie-a-Tie Half Windsor Knot diagram below. Adjust the length to achieve the perfect fit. With a little practice, you’ll see how quickly this technique becomes second nature. Mastering the Half Windsor Knot adds confidence and elegance to any modern wardrobe.

In this simple step-by-step tutorial we will show you how to tie a Half Windsor Knot. Half Windsor Knot Instructions with Graphic Image Learn at your favorite place

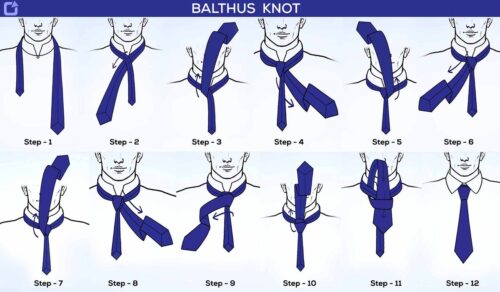
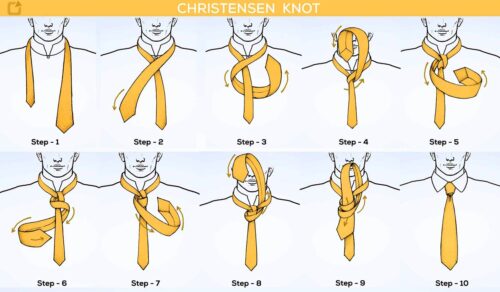
Half windsor knot tying steps, view in one image

This image half windsor knot tying steps, View in one image

The Half Windsor knot Step-by-Step instruction

This image is the first step of Half windsor knot.

STEP-1
Guys let’s start first step, With the wide end of the tie on the right and the short end on the left. The tip of the short end should be slightly above your belly-button Only move the active (wide) end.
Remark – This will vary depending on your height and the length and thickness of your tie.

This image is the second step of Half windsor knot.

STEP-2
Second step, Wide end on the short end of the left.

This image is the third step of Half windsor knot.

STEP-3
Third step, Under the small end and to the right.

This image is the forth step of Half windsor knot.

STEP-4
Fourth step, Up to the center, towards neck loop.

This image is the fith step of Half windsor knot.

Step-5
Fifth step, Through the neck loop and to the left.

This image is the sixth step of Half windsor knot.

STEP-6
Sixth step, Across the front, over to the right.

This image is the seventh step of Half windsor knot.

STEP-7
Seventh step, Up into the neck loop from underneath.

This image is the eighth step of Half windsor knot.

STEP-8
Eighth step, Down through the loop you’ve just created in the front.

This image is the ninth step of Half windsor knot.

STEP-9
Ninth step, Tighten the knot by pulling it at the wide end. Up and adjust the knot.

Below are other ways to tie a tie, whether it is a tie or if you are looking for a challenge to learn. Our step-by-step guides will help you with 15 classically popular neckties knots.