Parivrtta Janu Sirsasana (Revolved Head to Knee Pose)- Steps, benefits, and precautions
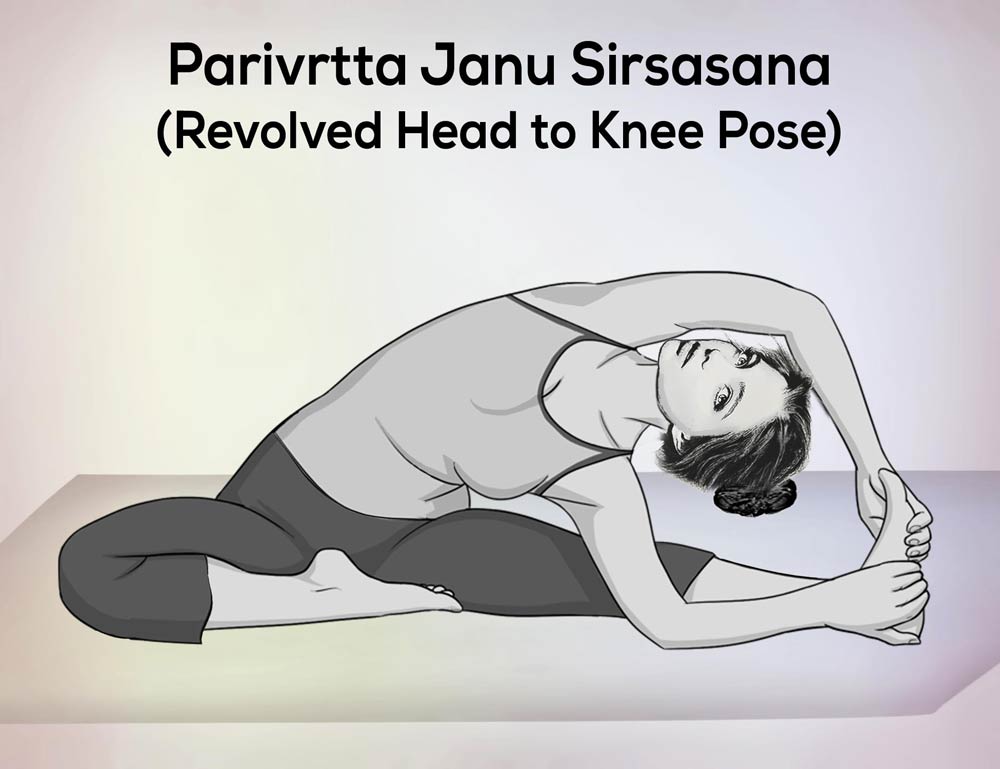
Parivrtta Janu Sirsasana; This asana is known in English as the name Revolved Head-to-Knee Pose. Parivrtta Janu Sirsasana is a Sanskrit word; in which the meaning of Parivrtta means Revolved, Janu stands for Knee, and the word Shirsa represents the head. (Parivrtta Janu Sirsasana) is a Sanskrit word; in which the meaning of Parivrtta means Revolved, Janu stands for Knee, and the word Sirsa represents the head.
This pose is intermediate-level pose for yoga practitioners. It is an intense stretch that improves your limberness and flexibility.
This article explains the benefits of Revolved Head-to-Knee Pose and the right way to practice it. The precautions to be taken while practicing this asana are also discussed.
Let us know the steps to practice Revolved Head-To-Knee Pose and its various benefits.
1)- Parivrtta Janu Sirsasana – Steps: The right to do Revolved Head-To-Knee Pose
2)- Parivrtta Janu Sirsasana (Revolved Head-To-Knee Pose) Beginner’s Tips
3)- Benefits of Parivrtta Janu Sirsasana (Revolved Head to Knee Pose)
4)- Precautions for Parivrtta Janu Sirsasana (Revolved Head to Knee Pose)
Parivrtta Janu Sirsasana – Steps: The right to do Revolved Head-To-Knee Pose
To practice Revolved Head-To-Knee Pose in the right way, follow the steps given below:
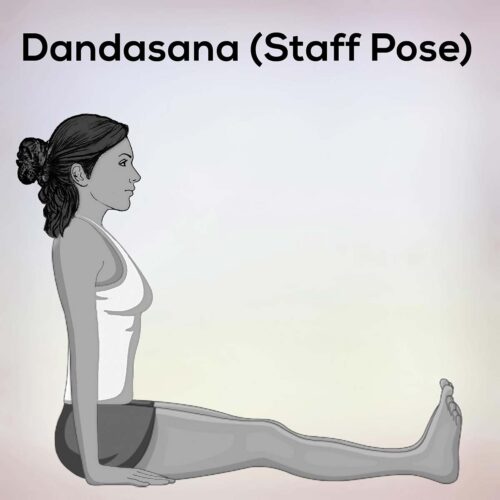
1)- Firstly to sit on Dandasana.
2)- Now bend your left leg and fold your leg in your waist.
3)- Then bend your right knee on a small scale and move it closer to your right hip.
4)- Exhale, during breath out turn sideways close to the right, and permit the back part of your right shoulder to press close to the inner part of your knee.
5)- Give your right lower hand (fore-arm) a chance to float along within the right knee and twist forward close to the foot.
6)- Now try to connect your right foot with both hands, right hand within the right knee, and left hand with the claw of your right foot.
7)- While holding the right leg, be sure to keep the left bent leg on the floor. At the same time, slowly expand and straighten your knee.
8)- During make straighten, your right knee places your torso towards the ceiling.
9)- After that raise your left hand and place it above your head and press it across the left ear.
10)- Isolate your elbows additionally extending your middle (Torso) as you do it. And remain in this pose for a few seconds.
11)- Then release the pose, making sure to release the stretch first and then your arms before discharging. After that come upward and breathe in at the same time.
12)- Repeat the same process with your other leg and opposite side.
Parivrtta Janu Sirsasana (Revolved Head-To-Knee Pose) Beginner’s Tips
If you are Beginner’s so flow this steps firstly sit on a folded blanket to find the length of your spine with more ease. If your elbow does not reach your knee, place your hand on the floor, or block the inside of the outer leg. If your hamstring is tight, bend your knees slightly. You can tie a strap around your outer leg and hold one or both ends depending on what seems most accessible. You fully straighten the knee, it is better to keep the lower shoulder in contact with the inside knee.
Benefits of Parivrtta Janu Sirsasana (Revolved Head to Knee Pose)
Revolved Head to Knee Pose has some excellent benefits. The points given below are as follows.
- Good in Headache.
- Beneficial in Insomnia.
- Release stress and fatigue and reduce anxiety.
- Opens the hips, groins and shoulders.
- Revolved Head to Knee posture is a very good posture that extends your hamstrings, shoulders, and spine.
- Revolved Head to Knee Pose stimulates the liver, kidneys and other vital abdominal organs.
- Beneficial for armpits and shoulders.
- Relieve common back pain.
Precautions for Parivrtta Janu Sirsasana (Revolved Head to Knee Pose)
Parivrtta Janu Sirsasana (Revolved Head to Knee Pose) may be good for your health, but here are some precautions you should follow:
- Avoid this pose if you have any injury or pain as Neck, shoulder or low back injuries.
- Avoid this pose if you have low blood pressure.
- If you are suffering from mild digestive system problems or diarrhea, do not do this asana.
- If you have a medical history, concern about your doctor before you practice. In the initial state you are not able to do this asana completely, do as per your abilities or as much as you can do it.
- This asana requires a lot of practice, so for this, you are good at other stretching and flexibility asana or the basic level of asana.
- All yoga activities require guidance, so practice all asanas under the supervision of a specialist.
Legal Disclaimer: Before participating in any exercise program or using any fitness products or services that may be described and/or made accessible in or through the Nexoye Website and/or the Services, you should consult with a physician or other healthcare provider.
