Surya namaskar (Sun salution): A Powerful Yoga Practice for Physical, Mental, and Spiritual Well-Being
Surya Namaskar is a popular yoga asana originally designed to honor the Sun. The word “Surya” means the Sun, and “Namaskar” combines two Sanskrit words: “Namah” (to bow or pray) and “Kara” (hands), which together mean “to greet with joined hands.” This sequence of movements flows smoothly from one to the next, offering a range of health benefits. Surya Namaskar serves as a great cardiovascular exercise, while also improving flexibility, strength, and mental clarity. Practicing this asana regularly enhances your physical health, reduces stress, and promotes spiritual growth. Suitable for people of all ages and fitness levels, Surya Namaskar helps keep your body healthy and disease-free, making it an essential part of a holistic wellness routine.
Let us know the steps to practice Surya Namaskar and its various benefits.
1)- Surya Namaskar mantra
2)- Surya Namaskar steps
3)- Benefits of Surya Namaskar – Step wise
4)- Benefits of Surya Namaskar in Chakras
5)- Tips for Surya Namaskar
6)- Asanas to be done before doing Surya Namaskar
7)- Asanas to be practiced after Surya Namaskar
8)- Who should avoid Surya Namaskar
9)- Surya Namaska side effects
Surya Namaskar mantra:
The following Sanskrit shloka is recited to begin Surya Namaskar:
Om,
Dheyayah sada savitrimandala madhyavarti
Narayanah sarsijasan-sannivishtah
Keyurvan makar-kundalwan kariti
Hari hiranmya vapudhrit shankha-chakrah
(Om, I pray to the Sun who is the centre of the solar system, who is one with the creator ‘narayana’ and adorned with pieces of jewellery)
Each of the 12 stages has different mantras associated with them, which greet the sun with different names:
Pranamasana- (Om Mitraya Namah), pray to the one who is the friend of all.
Hasta Uttanasana- (Om Ravayre Namah), to the one who is praised by all.
Hastapadasana- (Om Suryaya Namah), the one who is the guide of all.
Ashwa sanchalanasana- (Om Bhanave Namah), I pray to the one who is the bestower of beauty.
Dandasana– (Om Khagaya Namah), the one who stimulates all the senses.
Ashtanga namaskara- (Om Pushne Namah), I greet the one who provides nourishment to all.
Bhujangasana- (Om Hiranyagarbhaya Namah), Pray to the one who gives masculinity.
Adho mukha svanasana- (Om Marichaye Namah), praying to the one who helps in keeping our body disease free.
Ashwa sanchalanasana- (Om Adityaya Namah), I greet the one who inspires love.
Hastapadasana- (Om Savitre Namah), pray to the one who is the begetter of life.
Hasta Uttanasana- (Om Arkaya Namah), praise to the one who creates wonder.
Tadasana- (Om Bhaskaraya Namah), the one who is the brightest of all, I pray to him.
All of these chants basically mean the same ‘salute the sun’.
The mantra chanted at the end of Surya Namaskar is:
Aadityasya namaskaran ye kurvanti dinne dinne
Aayu, pragya, balam, viryam, tejsteshan cha jaayate.
This means: People who greet the sun every day, live longer, gain more intellect, power, sexual vigour and energy.
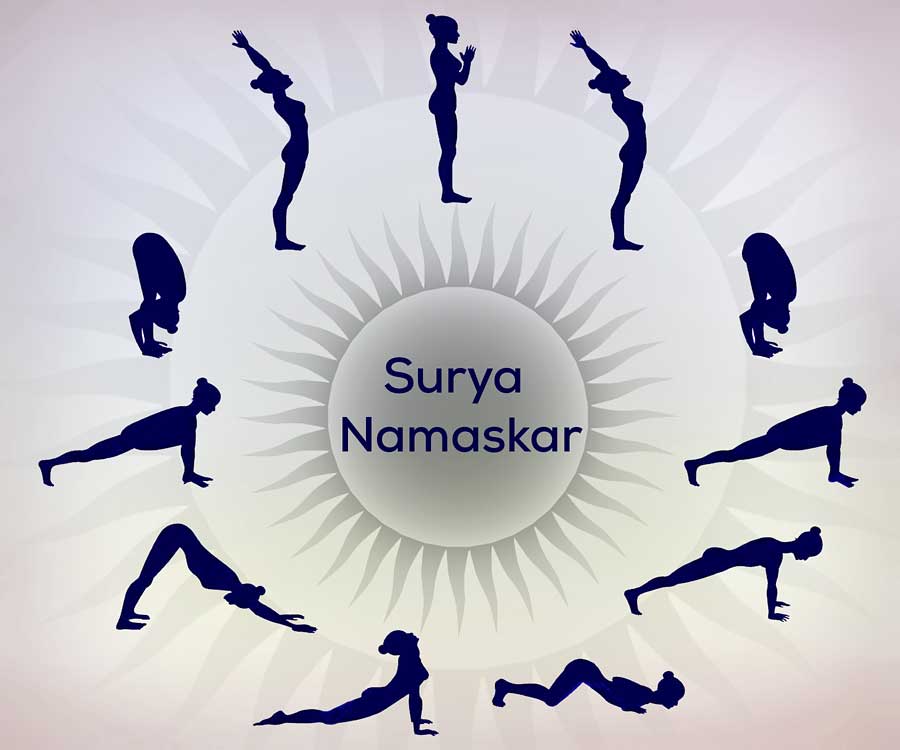
Surya Namaskar steps
- Pranamasana- (Which is also known as prayer posture). To begin with, stand on the edge of the mat, keeping your feet closed. Relax your shoulders, raise both hands while inhaling and join your palms together in front of the chest in the prayer position. Remember to keep your spine straight and upright.
- Hasta Uttanasana (The raised arm pose)- Keeping your palms joined together, breathe in and lift your arm above your head until it slightly curves towards your back. This helps to stretch all your body muscles from the tip of fingers to the heels. Make sure your biceps are close to your ears.
- Hastapadasana (Hand to toe pose)- While exhaling, start bending from the waist until both of your palms are flat on the floor of your feet and you have fully breathed. Do not bend your knees. Your spine should be parallel to your body.
- Ashwa sanchalanasana (Equestrian pose)- Push your right leg back (as far as possible) and look up. Your right knee should be touching the floor and it should be at an angle of 90 degrees to your thigh so that the toes of your right foot are touching the floor. Your left knee should be bent and your palms should be placed on either side of your left foot. Keep your right thigh at an angle of 180 degrees with the floor and your weight equally balanced between your feet.
- Dandasana (The stick pose)- Push your left leg back and bring your body in a straight line parallel to the floor. Breathe while doing so. Your palms are on both sides of your face, your palms are flat on the floor.
- Ashtanga namaskara (Salute with eight parts or joints)- Gently bring down your knees on the floor and breathe out. Slightly move your hips back and slide forward. Bring your chest and chin on the floor. Your palms should be flat on the ground in line with your shoulders. Your elbows should be bend on either side of your chest. Now elevate your posterior a bit. (2 hands + 2 feet + 2 knees + chest and chin = 8 parts should touch the ground).
- Bhujangasana (Cobra pose)- Slide forward so that the entire lower part of your body rests on the floor. Gently, lift the upper half of your body. While exhaling, push your chest forward and when you exhale, tighten the naval muscles. Your face should be towards the ceiling. You can tilt your shoulders backwards but keep them away from your ears.
- Adho mukha svanasana (Downward facing dog)- As you breathe out, lift your hips and push your chest downwards to form an inverted-V like position. Try to keep your heels on the ground much as possible. As this pose completes, your hips should be facing the rood and your palms should be on the floor. This step depicts that you are completely surrendering to the sun god.
- Ashwa sanchalanasana- Repeat the 4th step but now with the left leg pushed backwards.
- Hastapadasana- Bring the left leg forward and return to the 3rd posture. Place your palms on the ground near your feet.
- Hasta Uttanasana- Pull your body upward and breathe. Raise your hands directly above your head. Keep your palms joined as you do so. Slightly push your body backwards and come back into the 2nd pose.
- Tadasana (The mountain pose)- Get back to a normal standing position while exhaling out. Keep your palms joined in front of your chest for a moment, then, gently bring your hands down on the sides.
After completing all the given 12 steps, a round of Surya Namaskar is complete and you are now ready to start with the second chakra.
Start doing 2 sets in a day and then you can gradually increase. You can do 108 repeats of Surya Namaskar in a day.
Benefits of Surya Namaskar – Step wise
- Pranamasana- It helps in maintaining balance of body and aids in relaxation of nervous system. It also strengthens the heart chakra.
- Hasta Uttanasana- This asana helps to increase total oxygen intake and lung capacity. As it is involved in the respiratory process, this asana activates the throat chakra and helps to relieve ear and throat problems.
- Hastapadasan– It makes the lower back and the spine flexible.
- Ashwa sanchalanasana- This asana improves your posture and calms the mind. This increases memory and feeling.
- Dandasana– Makes the spine and neck flexible, also supports digestion.
- Ashtanga namaskara- This step strengthens the back muscles along with reducing stress and anxiety. It also increases will power.
- Bhujangasana- Stretches the shoulders and helps elevate the mood.
- Adho mukha svanasana- It increases blood flow to the spinal cord area, which is good for the peripheral nervous system.
- Ashwa sanchalanasana– It tones the abdominal muscle and adds flexibility to leg muscles.
- Hastapadasana- The 10th step of Surya Namaskar, opens up the hip, shoulders, and arms.
- Hasta Uttanasana- It is similar to the second stage and therefore has the same benefit, which leads to complete intake of oxygen and improvement in throat and ear problems.
- Tadasana- It helps in improving the overall stature of the body and helps in making your heart strong.
Benefits of Surya Namaskar in Chakras
Being an ideal amalgamation of various yoga asanas, Surya Namaskar is a complete workout for the body. A comprehensive exercise without the need of any equipment.
Sun salution works on most of these chakras and hence has many astonishing benefits on the human body.
- Muladhara (root chakra)
- Svadhisthana (pelvic or sacral chakra)
- Manipura (navel chakra)
- Anahata (heart chakra)
- Vishuddha (throat chakra)
- Ajna (third eye chakra)
- Sahasrara (crown chakra)
Some of the benefits are listed below:
- Surya Namaskar strengthens your back and muscles. Muscle endurance, especially in limb muscles, improves very rapidly. Regular Surya Namaskar compared to running on a treadmill.
- By alternately contracting and relaxing the abdominal muscles, it tones your stomach and improves your digestive system.
- Provides proper oxygenation to the body. And also helps in detoxification.
- Surya Namaskar combats insomnia and reduces anxiety. This is because it helps reduce the effects of stress hormones such as cortisol and adrenaline on the body.
- It helps prevent constipation and indigestion.
- Improves memory by developing the central nervous system.
- Makes your body flexible and toned.
- Normalizes the activities of the endocrine glands. This means that your hormones are functioning optimally.
- It helps in reducing body fat, thus aiding in weight loss.
- Rejuvenates your skin.
- It improves your communication system.
- In women, Surya Namaskar helps in maintaining the regularity of the menstrual cycle. It also assists in easy childbirth and keeps your breasts from sagging with age.
- Creates a balance between body and mind.
- This slows down the aging process.
- It helps in controlling blood sugar levels.
- As there is a better practice of Surya Namaskar, preferably facing the sun and under direct sunlight, it helps in maintaining the balance of D vitamins in our body.
Tips for Surya Namaskar
- East or West- Choose the direction according to the time of practice. Stand facing east in the morning and west in the evening.
- The correct time to practice Surya Namaskar is at sunrise. (Around 5:00 – 5:30 a.m.)
- Try to think positive thoughts while doing Surya Namaskar.
- These asanas are best performed along with chanting mantras.
- Shavasana is practiced after Surya Namaskar to give your body a rest.
- Be aware of the pose and its effects on your body. If you feel stiffness or discomfort in any posture, you may need to work more on that body part or muscle.
- It should be done on an empty stomach or at least 3-4 hours after a meal.
- Avoid intake of water or any other liquids before and after Surya Namaskar.
- Try not to bath immediately after the asana. Give your body some time to rest.
Asanas to be done before doing Surya Namaskar
You do not need to practice any yoga asana before performing Surya Namaskar, this should be the beginning for any yoga.
Asanas to be practiced after Surya Namaskar
You can do any yoga practice after practicing Surya Namaskar. Some of these are:
- Utkatasana (chair pose)
- Parivrtta utkatasana (revolved chair pose)
- Anjaneyasana (low lunges)
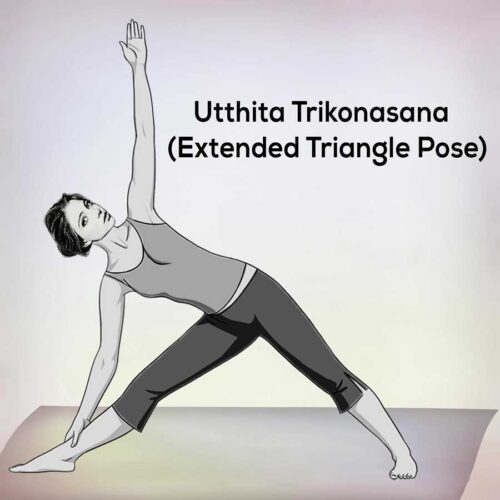
- Trikonasana (triangle pose)
- Virabhadrasana III (warrior 3)
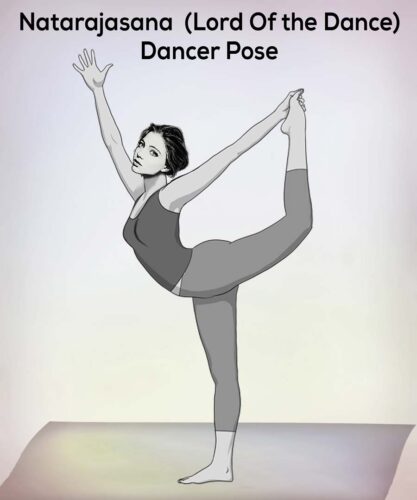
- Natarajasana (dancer pose)
Who should avoid Surya Namaskar
- Women should not practice during their menstruation or pregnancy.
- If you have any disease like fever or joint pain then stop yourself from practicing Surya Namaskar.
- One should avoid practising surya namaskar in case of high blood pressure, heart diseases, fever, slipped disk, hernia, intestinal tuberculosis and sciatica.
- Those who have undergone surgery recently should not practice Surya Namaskar.
Surya Namaska side effects
Proper practice of Surya Namaskar has no side effects. It is important to exhale your breath and inhalation and exhalation at the right time to avoid muscle pulls and to provide your body with the right amount of energy and oxygen at the right time. Missing a step or improper posture can cause these side effects:
- Body ache
- Ankle sprain
- Muscle pull
- Pain in neck
So attend a yoga class carefully to learn more about proper breath control and easy posture merging.
